Reactjs - 簡易聊天室
- 簡單介紹利用 reactjs 模擬一個聊天室
- 本文的範例來源 chatroom
- 如果對 ES6 語法不熟悉,請參考此篇:Beginning - ECMAScript 6
- 2015-11-21 嘗試實作 redux:redux - Chat Room
Intro
在開始之前,我覺得大家應該可以先讀一下 Thinking in React 這篇文章,非常的有幫助! 我自己剛開始在寫 reactjs 的時候真的是跌跌撞撞的(我本身程式又不是很好), 那時候都是簡單的模仿然後感受一下 reactjs,但是發現當自己在實作的時候就會發現問題了, 這篇文章是由 Pete Hunt 所寫的一篇教學,讓我們用 component 角度去思考如何建構自己的 App。
五大步驟:
- Break the UI into a component hierarchy
- Build a static version in React
- Identify the minimal (but complete) representation of UI state
- Identify where your state should live
- Add Inverse data flow
上面的五大步驟其實大概是這樣:
- 首先,將自己的模型定義出來
- 將你的 UI 介面拆成各個 component
- 用 React 建立一個靜態版本
- 確認並表示出 UI 最小(但是完整的)的狀態
- 確認你的狀態(state)應該在哪裡
- 加入反向數據資料流
Static Interface
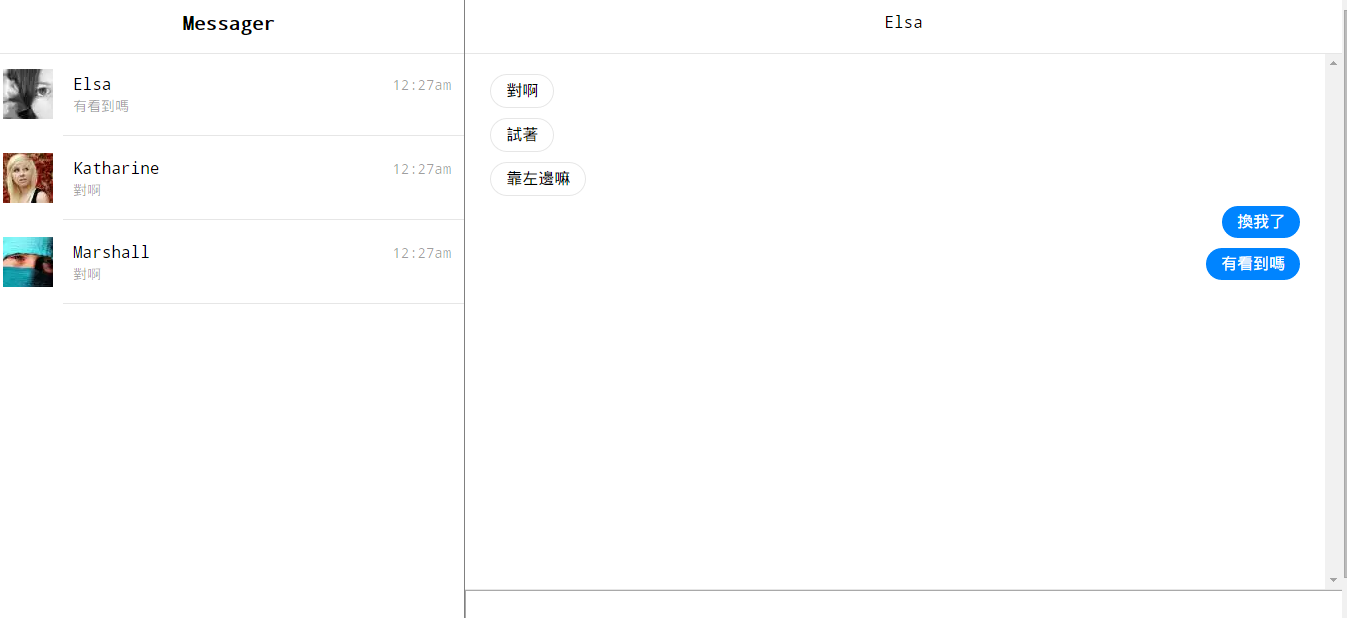
我們先看一下我們要實作的介面,我們先建立一個靜態的網頁:Chat Room Model
使用方法請參考下方 README。

Component
左邊有一個對話者清單,有三個對話者,右邊則是對話記錄中的對話內容,下方則有一個輸入框。
為什麼要這樣分呢?就像上面所提到的 Break the UI into a component hierarchy,我們將這個畫面拆成好幾個元件,每個元件負責一個功能(單一責任原則),這樣我們很可以很易於掌控我們每個元件所負責的事情。
Static Version In React
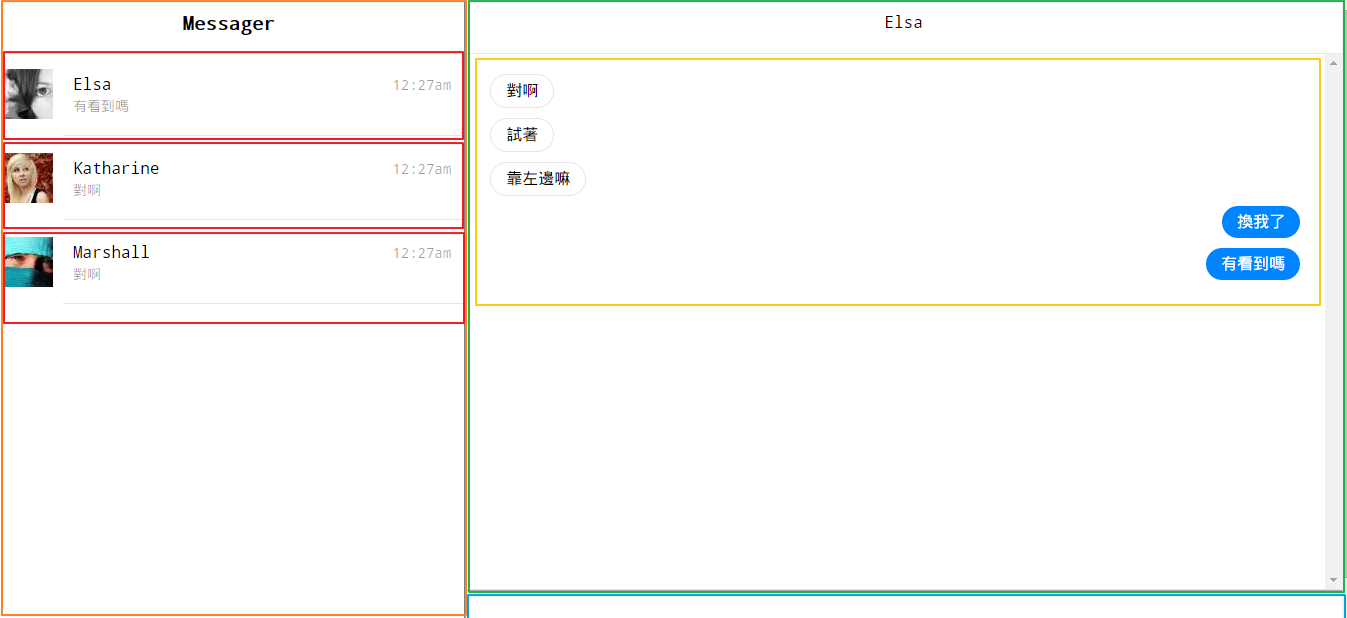
我們接下來就可以用 reactjs 先建立一個靜態版本的 chatroom 囉!,我們依照上面的 component 地方所提到的,我們將它拆成五個部分:
- App
- Messager
- MessageList
- MessageItem
- UserInput
我們將各個 component 組合起來就變成一個完整的 App,大概解釋一下各個元件的功能:
- Messager 是對話者清單,這個元件負責將使用者姓名、大頭照、最後對話內容、對話時間顯示出來。
- MessageList 則是使用者間的聊天內容。
- MessageItem 處理則是每條對話內容。
- UserInput 讓使用者輸入訊息的輸入框。
reactjs 靜態版本範例 (尚未加入 MessageItem):reactjs static version
State
在這個 chatroom 中,我們根據上面來定義了一個最簡單的狀態:
const initialState = {newMessage: '',threads: [{target: {name: 'Elsa',profilePic: 'http://lorempixel.com/50/50/people/1'},messages: [{ fromMe: false, text: '對啊', time: '12:27am' },]}],currentIndex: 0};
newMessage 是我們的輸入訊息,threads 內則是使用者相關的資料和對話訊息,currentIndex 則是目前的使用者。
讓我們開始吧!

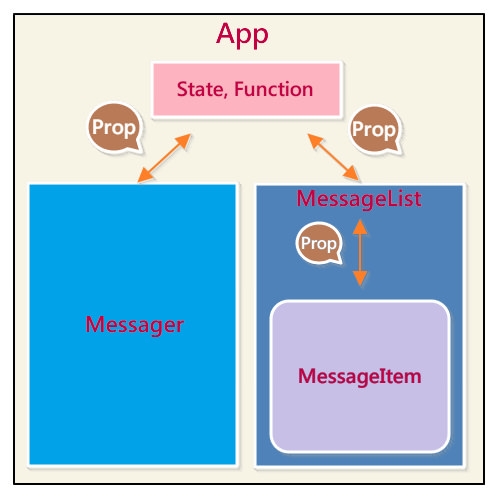
畫的感覺不是很好的圖,但是想透過圖片看能不能更清楚表達一些(笑)。
Chat Room - 點我看完整範例!
App 就是我們整個的應用程式,在這次的 chatroom 中,我們在 App 定義了一個 initialState 是我們的應用程式的初始狀態。
但是 App 不一定要擁有 State,如果是 Flux 實作,則是會把 State 抽出來放在 Store,所以 App 會變成 Stateless component 但是我們先不討論這一塊。
在 App 中,我們可以將 state 或者是 function 當作 props 傳遞下去,需要被當作 props 傳遞的 function 是那些會 mutate state 的。
首先,我們先來討論左半部的 component,App 在 render 時先解構了 state:
const { threads, currentIndex } = this.state;
解構後,我們可以從 threads 中我們拿到所有使用者的資料,我們透過 map 方式並在 return 的時候我們將 Messager 的元件加入,把資料往下傳到 Messeager。
{threads.map((thread, id) => {const { target, messages } = thread;const lastMessage = messages[messages.length - 1];return (<Messagerkey={id}src={target.profilePic}name={target.name}content={lastMessage.text}time={lastMessage.time}handleMessagerChange={this.handleMessagerChange.bind(this, id)}/>);})}
Messager 可以接收到從上層傳下來的 props。
const { src, name, content, time, handleMessagerChange } = this.props;
我們在 Messeager 中先解構由 App 所傳下來的this.props,這邊特別注意到 handleMessagerChange,是由 App 所傳下來的 function,這個 function 的目的是為了 切換使用者。
需要被當作 props 傳遞的 function 是那些會 mutate state 的。
我們將 handleMessagerChange 加入到這裡:
<li className="thread-item" onClick={handleMessagerChange}>
讓我們在點擊 (onClick) 的時候可以觸發動作切換使用者。 左半部的 Component 的功能大概就是以上,接著我們來看右半部的地方囉!
在右半部的 MessageList Component 會從 App 中拿到 state 內的 threads 和 currentIndex,
接著就是把這些 state 當作 props 傳下去。
<MessageList threads={threads} index={currentIndex} />
進到 MessageList component 內,我們在 render 時先解構 this.props 得到 threads 和 index。
const { threads, index } = this.props;const messages = threads[index].messages;
接著,我們將 messages map ,這時候將 MessageItem 加入進來。
<div>{messages.map((message, id) => (<MessageItem key={id} fromMe={message.fromMe} text={message.text} />))}</div>;
接下來我們來到了MessageItem,這裡是負責每條訊息的顯示,我們從 this.props 中將 fromMe 和 text 解構出來,fromMe 用來表示訊息是否由自己發出的,text 則是訊息內容。
const { fromMe, text} = this.props;
return (<div className={`message-item ${fromMe ? 'message-from-me' : 'message-from-other'}`}><span>{text}</span></div>);
最後剩下的是 UserInput component:
<UserInputnewMessage={this.state.newMessage}messageChange={this.handleMessageChange.bind(this)}handleKeyDown={this.handleKeyDown.bind(this)}/>
在 App Component 最後我們加入了 UserInput component,並將 App 內的 state 和 function 當做 props 傳到 UserInput。
- handleMessageChange => function
- handleKeyDown => function
首先,一樣先將接收到的 this.props 做解構:
const { newMessage, messageChange, handleKeyDown} = this.props;
在 input 的地方可以將解構後得到的 newMessage、messageChange、handleKeyDown 帶入:
return (<input className="new-message"value={newMessage}onChange={messageChange}onKeyDown={handleKeyDown}/>);
這樣 input 在觸發 onChange 和 onKeyDown 時,就可以透過由 props 傳下來的 function 來操作了。
結論
整個操作流程我只是大概描述一下比較重要的地方,其他細節可以參考原始碼做對照, 相信應該不會有太大的問題,只要把握住上方所提到的那五大要點,相信你可以很快地了解這個範例。
我自己也還是個 reactjs 初學者,但希望可以透過記錄和分享方式和大家一起學習:)。Happy Coding!