初識 Protocol Buffers


👨🏻💻 本文主要是參考官方文件所做的心得記錄
Protocol Buffers 是由 Google 所推出的一個跨平台、語言的「可擴展的序列化資料結構」,可以把它想像成是 XML,或者是 JSON 的資料結構,但是它的資料體積更小、傳輸更快。基本上,只要定義一次,就可以在不同的語言上使用這個定義好的資料結構,例如:Python、Go、Java、C++ 等其他語言。
Protocol Buffers 的檔案容易撰寫,如同在寫文件,當你定義結構完成後,就等同於把文件寫完了。Protocol Buffers 也提供了各種編譯器讓你可以把檔案編譯成你所需要的語言格式。
使用 Protocol Buffers 在傳輸資料時,會將資料「序列化」後才送出,下圖是經過序列化後的示意圖:

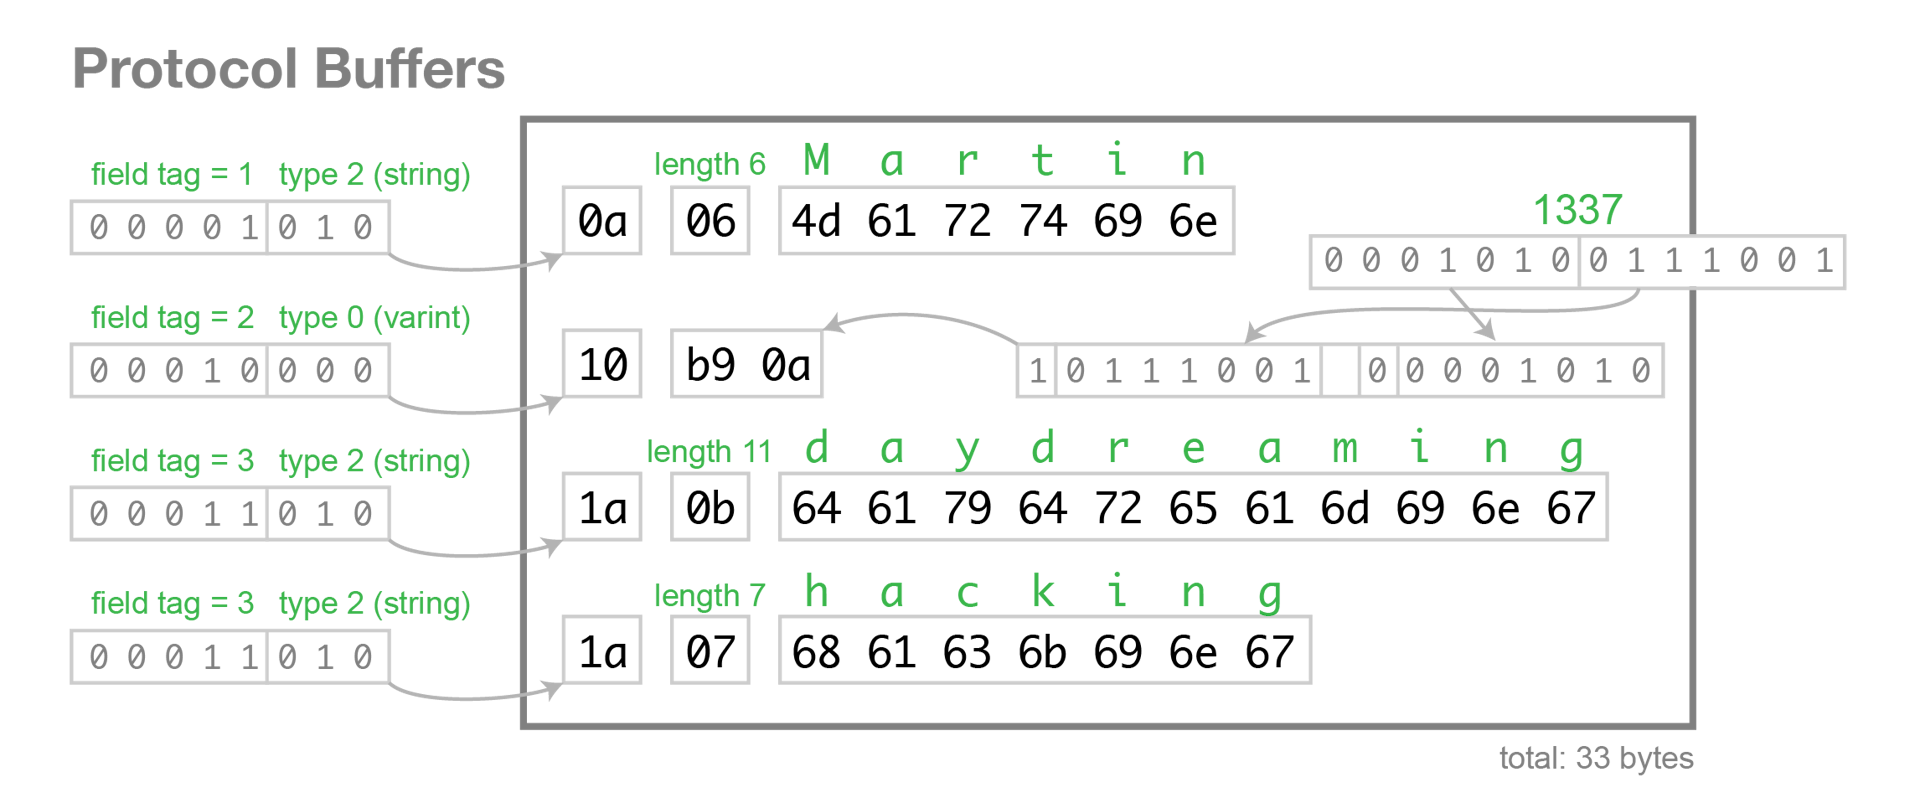
而這些被「序列化」的資料,也可以被「反序列化」回來。
Protocol Buffers 的優點除了以上所提到的,從這張圖也可以發現它提升了資料的隱匿性,一般在使用 JSON 做資料交換時,我們可以很容易地了解傳遞的內容,但是透過 Protocol Buffers 來做傳輸,因為經過編碼後,只能看到一堆字節。
定義結構
Protocol Buffers 使用 .proto 作為檔案名稱的後綴,例如:student.proto,以下面是一個簡單的 Student 資料結構:
message Student {string name = 1;string age = 2;string gender = 3;int32 number = 4;}
Student 具備以上四個欄位,每個欄位都有定義型別,而每個欄位後都有一個數字,它的作用是在二進制格式中,用來「識別(identify)」欄位。
🔎 關於型別請參考:Language Guide (proto3)
⚠️ 識別號碼在 [1 - 15] 時,佔用 1 個 byte,而 [16 - 2047] 則佔用 2 個 byte。原則上,你應該將你常用的欄位放在 [1 - 15] 的識別號碼內。
️️⚠️ 識別號碼最大值可以到 2^29(536,870,911),其中 [19000 - 19999] 則是保留給
FieldDescriptor::kFirstReservedNumber到FieldDescriptor::kLastReservedNumber的欄位。
Protocol Buffers 有 v2 和 v3 的版本,基本上都會使用較新的 v3 版本,在定義結構時,請不要忘了在 .proto 檔案的最上方加入,如果忘了加入,compiler 會預設你使用的是 v2 版本:
安裝 Protocol Buffers Compiler
Protocol Buffers 提供了各種語言和不同系統的編譯器,可以到 google/protobuf Release 頁面下載根據你電腦系統的 Proctol Buffers 版本。
因為我的作業系統是 OSX,所以選擇 OSX 的編譯器。下載回來解壓縮後,會看到有一個執行檔,你可以將這個執行檔放到 /usr/local/bin 目錄下,這樣就可以在終端機上執行 .proto 檔案的編譯了。
Go ProtoBuf
Protocol Buffers 提供了許多語言的實作,這裡使用 Go 作為範例。
首先,你必須要先安裝 Protocol Buffers 的編譯器,接著需要取得 Go 版本的 protobuf plugin:
$ go get -u github.com/golang/protobuf/protoc-gen-go
protoc-gen-go 的 plugin 預設會被裝在 $GOPATH/bin,這裡請注意你必須將 $GOPATH 設定好,這樣 protoc 才有辦法找到這個 protoc-gen-go 的 plugin。
編譯 .proto 檔案
建立一個 protoc-buffers-example 目錄,接著進入目錄後建立一個 student.proto 的檔案:
💡 可以將目錄建立在 Go 的 workspace 下,這樣之後可以方便引入使用。
protoc-buffers-example└── student.proto
接著把以下內容貼到 student.proto:
syntax = "proto3";message Student {string name = 1;string age = 2;string gender = 3;int32 number = 4;}
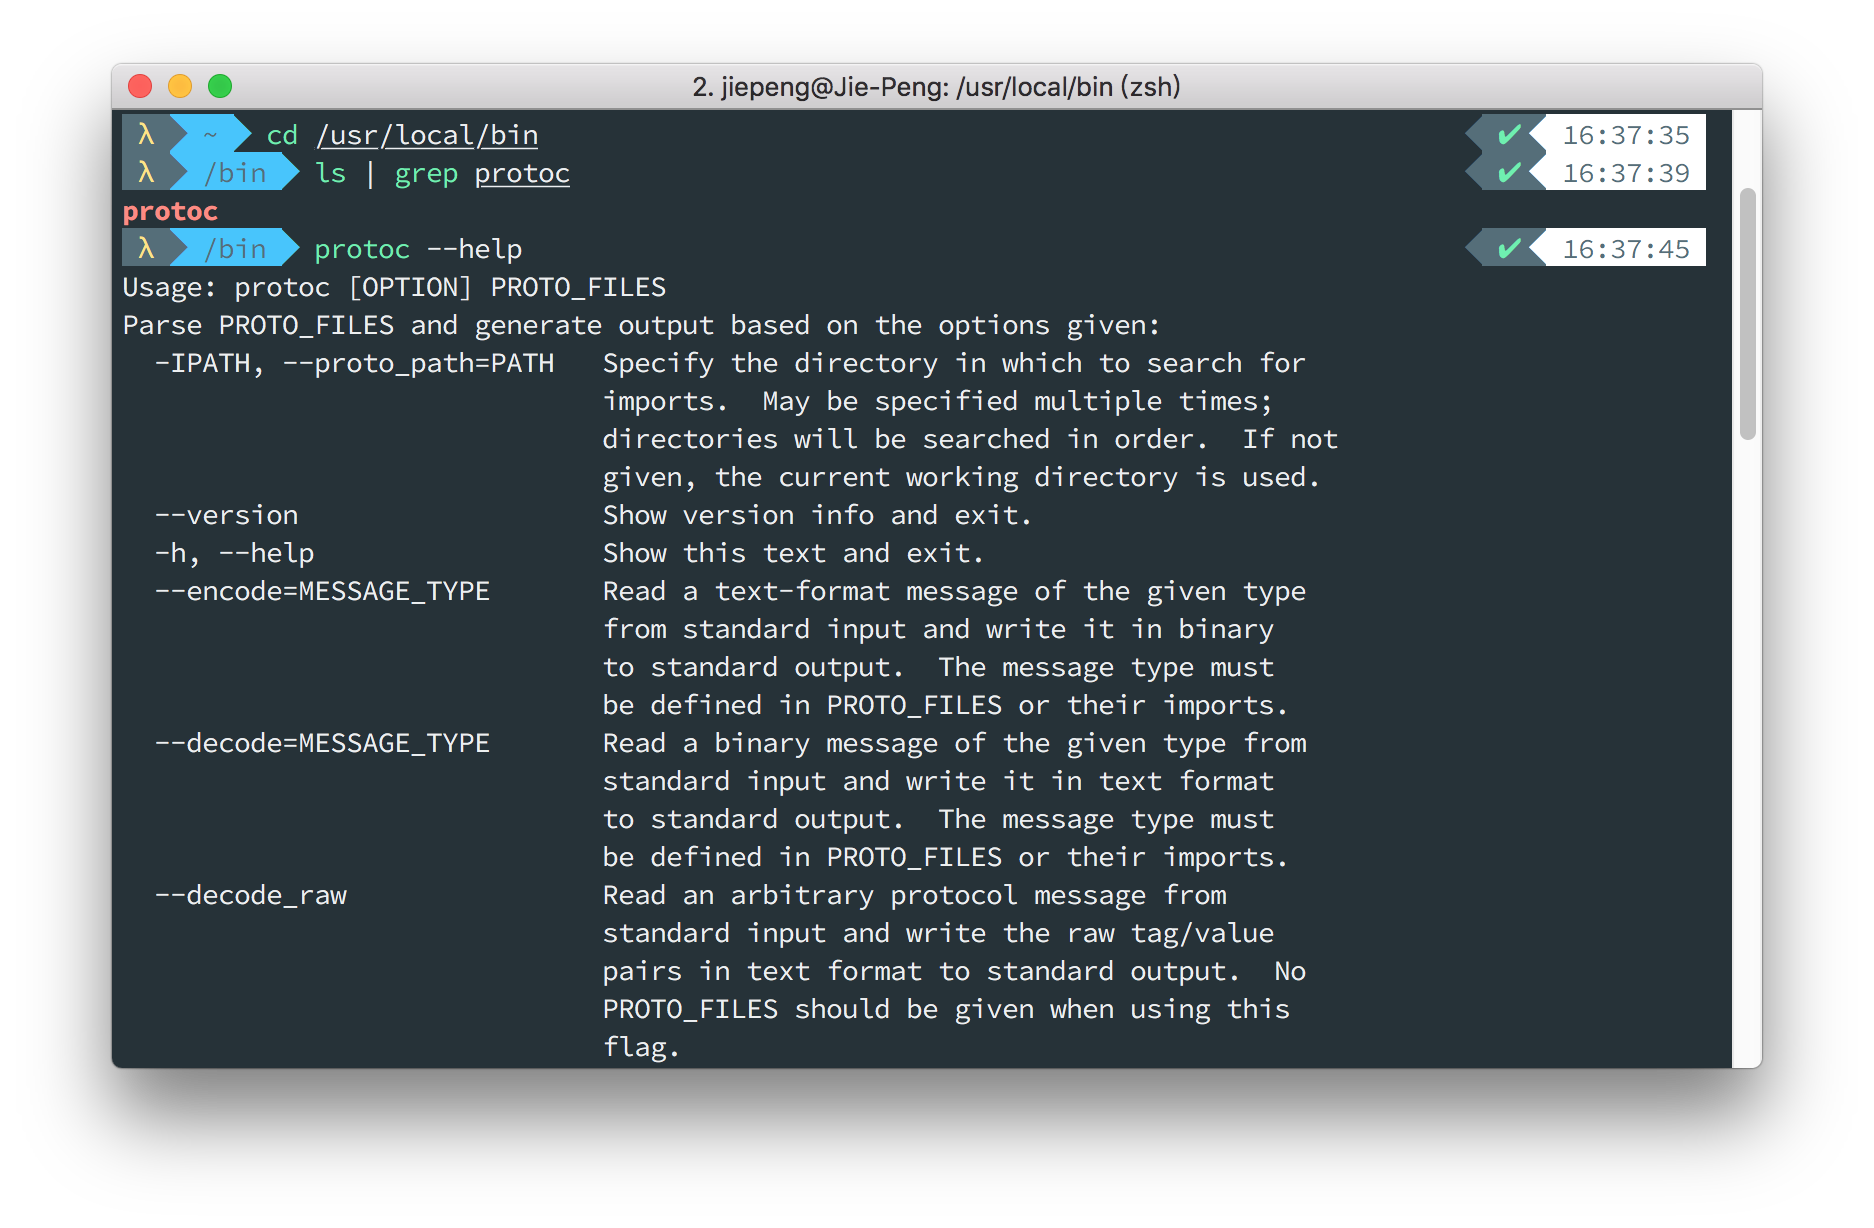
使用 protoc --help 來查詢該如何將 proto 檔案編譯成特定語言:
--cpp_out=OUT_DIR Generate C++ header and source.--csharp_out=OUT_DIR Generate C# source file.--java_out=OUT_DIR Generate Java source file.--js_out=OUT_DIR Generate JavaScript source.--objc_out=OUT_DIR Generate Objective C header and source.--php_out=OUT_DIR Generate PHP source file.--python_out=OUT_DIR Generate Python source file.--ruby_out=OUT_DIR Generate Ruby source file.
啊幹!竟然沒有 Go 語言的,不過還好在 golang/protobuf 的 README 上有寫到:
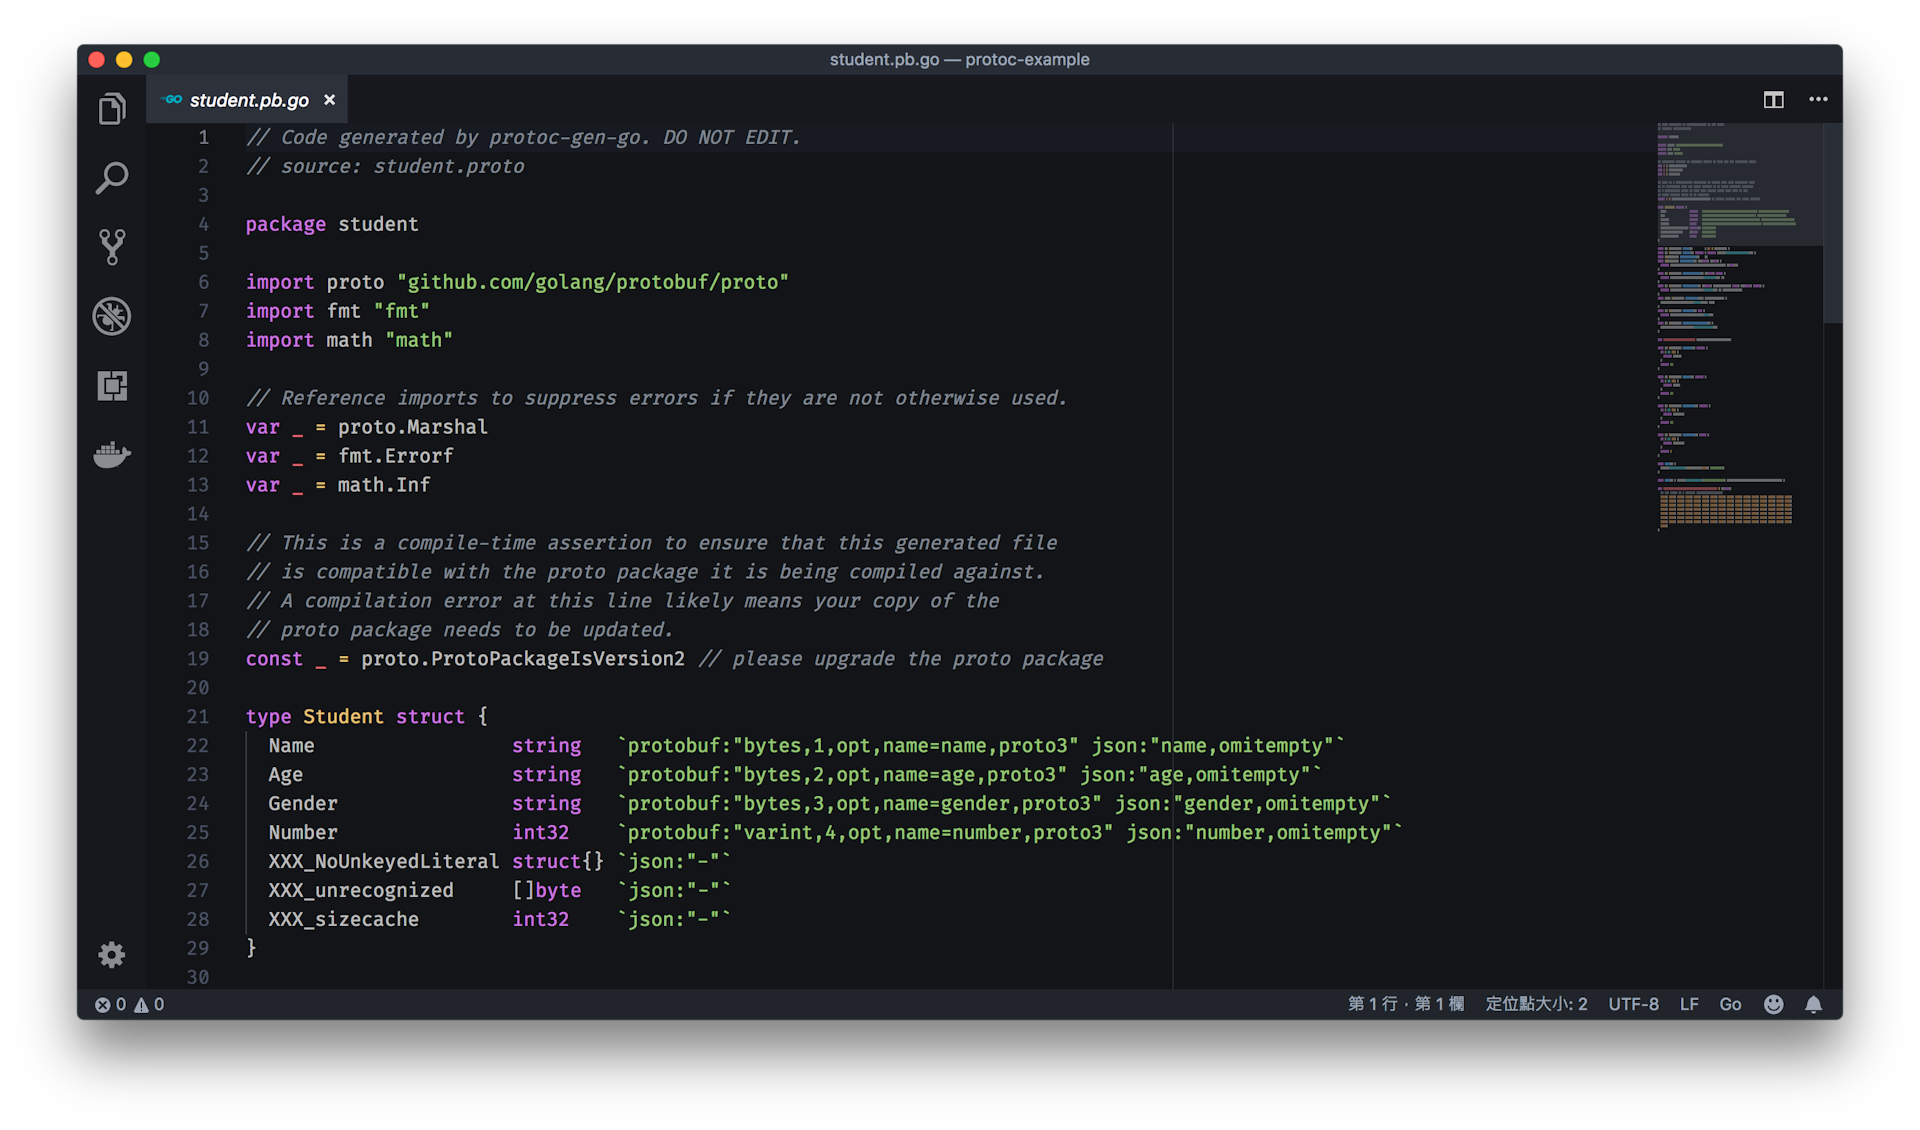
$ protoc --go_out=. *.proto
產生完成後會得到一個 student.pb.go 的檔案,而產生檔案的內容如下:

建立一個 main.go,接著引入編譯後的 student.pb.go 使用,以下是個簡單的範例:
package mainimport ("log"pb "github.com/neighborhood999/student")func main() {s := &pb.Student{Name: "Peng Jie",Age: 24,Gender: "Male",Number: 99,}log.Println(s.GetName(),s.GetAge(),s.GetGender(),s.GetNumber(),)}
以下是 Getter 列印的結果:
$ go run main.goPeng Jie 24 Male 99
嘗試將內容進行序列化:
package mainimport ("log""github.com/golang/protobuf/proto"pb "github.com/neighborhood999/student")func main() {s := &pb.Student{Name: "Peng Jie",Age: 24,Gender: "Male",Number: 99,}data, err := proto.Marshal(s)if err != nil {log.Fatal(err)}log.Println(data)}
執行結果:
$ go run main.go2018/07/26 18:41:10 [10 8 80 101 110 103 32 74 105 101 16 24 26 4 77 97 108 101 32 99]
假設接收到以上的資料,也可以把資料再反序列化回來:
package mainimport ("log""github.com/golang/protobuf/proto"pb "github.com/neighborhood999/student")func main() {s := &pb.Student{Name: "Peng Jie",Gender: "Male",Age: 24,Number: 99,}data, err := proto.Marshal(s)if err != nil {log.Fatal(err)}ss := &pb.Student{}err = proto.Unmarshal(data, ss)if err != nil {log.Fatal(err)}log.Println(ss)}
$ go run main.go2018/07/26 18:46:43 name:"Peng Jie" gender:"Male" age:24 number:99