在 Docker 上執行 Ethereum

這陣子在上 Ethereum 的線上課程,其中課程章節中有一段需要你安裝 Ethereum 的環境 - go-ethereum,也就是 Ethereum 的 Client 端,你可以透過 geth 指令與整個區塊鏈做互動,例如查詢區塊資訊等其他的功能。
在課程的內容中,請學生使用虛擬機安裝 Ubuntu,並在上面安裝 go-ethereum,對於像是 geth 這種指令操作介面的程式,安裝整個 GUI 真的是不太需要啊,後來發現 go-ethereum 有提供 Docker 的映像檔,讓你可以透過 Docker 來安裝 go-ethereum。
本文主要是記錄如何在 Docker 上安裝 ethereum,並且同步區塊鏈上的資訊。
🐳 Dockerfile
雖然可以直接透過 docker pull 將映像檔直接抓下來使用,但是秉持著研究的精神,稍微理解一下官方的 Dockerfile 內容:
# Build Geth in a stock Go builder containerFROM golang:1.10-alpine as builderRUN apk add --no-cache make gcc musl-dev linux-headersADD . /go-ethereumRUN cd /go-ethereum && make geth# Pull Geth into a second stage deploy alpine containerFROM alpine:latestRUN apk add --no-cache ca-certificatesCOPY --from=builder /go-ethereum/build/bin/geth /usr/local/bin/EXPOSE 8545 8546 30303 30303/udpENTRYPOINT ["geth"]
go-ethereum 的 Dockerfile 使用了多階段構建(Multiple Stage Builds),有興趣可以參考我之前寫的「透過 Multiple Stage Builds 編譯出最小的 Docker Image」,前面四行主要是將整個 Geth 給 Builds 出來後,接著使用 alpine 執行前面構建後的結果,也就是 Build 出 Geth 這個 binary 的執行檔:geth,當容器執行後,會執行 geth 的命令。
⛓ 拉取映像檔並建立容器
請執行以下命令拉取映像檔:
$ docker pull ethereum/client-go
拉取完畢後,使用這個映像檔來建立一個新的 Container:
$ docker run -d --name eth-ropsten-node -v $HOME/geth/ropsten:/root \-p 8545:8545 -p 30303:30303 \ethereum/client-go \--testnet \--syncmode "fast" \--cache=1024
稍微說明一下這段指令:
docker run:執行一個新的 Container-d:在背景執行 Container 並且列印出 Container 的 ID--name eth-ropsten-node:Container 的名稱-v:綁定 Volume 的位置,$HOME/get/ropsten是本機端的目錄,對映到 Container 的root目錄-p 8545:8545 -p 30303:30303:要 expose 的 portethereum/client-go:指定映像檔名稱,使用我們剛剛拉取回來的映像檔--testnet、--syncmode "fast"、--cache=1024:當容器起來後,會執行ENTRYPOINT的指令,可以參考上面的 Dockerfile
因為針對課程內容需要,加入了一些額外的參數:
- 使用測試鏈的資料,加上
--testnet(使用 Ropsten 測試鏈),預設會同步主鏈 - 設定同步模式:
--syncmode "fast"(模式有:fast、full、light) - 設定區塊的 cache 大小為
1024(預設就是為1024,可以省略不打)
⚠️ 注意:同步模式的參數請不要打成
--fast,因為在新的geth中已經使用--syncmode取代--fast了
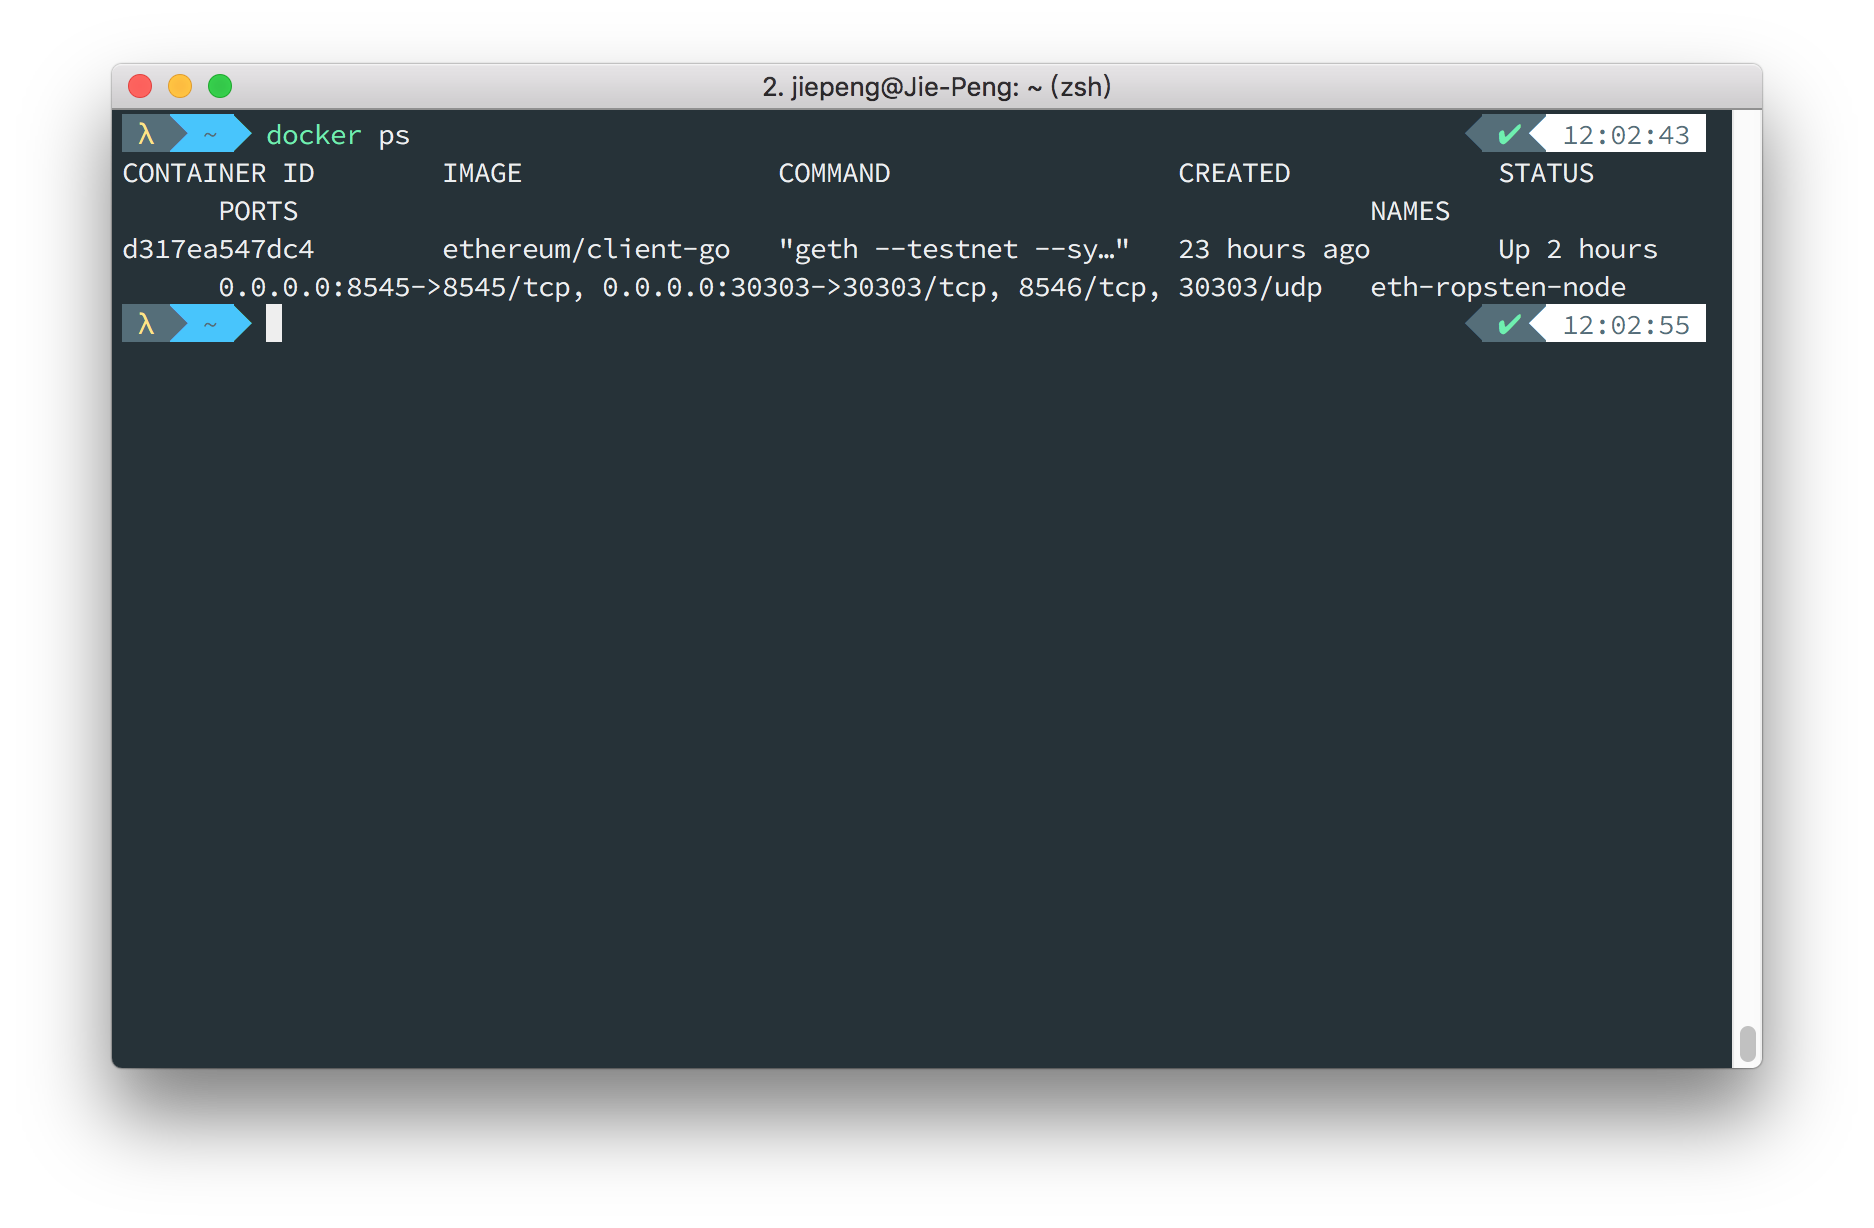
這樣容器就已經建立成功了,使用 docker ps 查看:

🔁 查看區塊同步狀況
請輸入以下的指令:
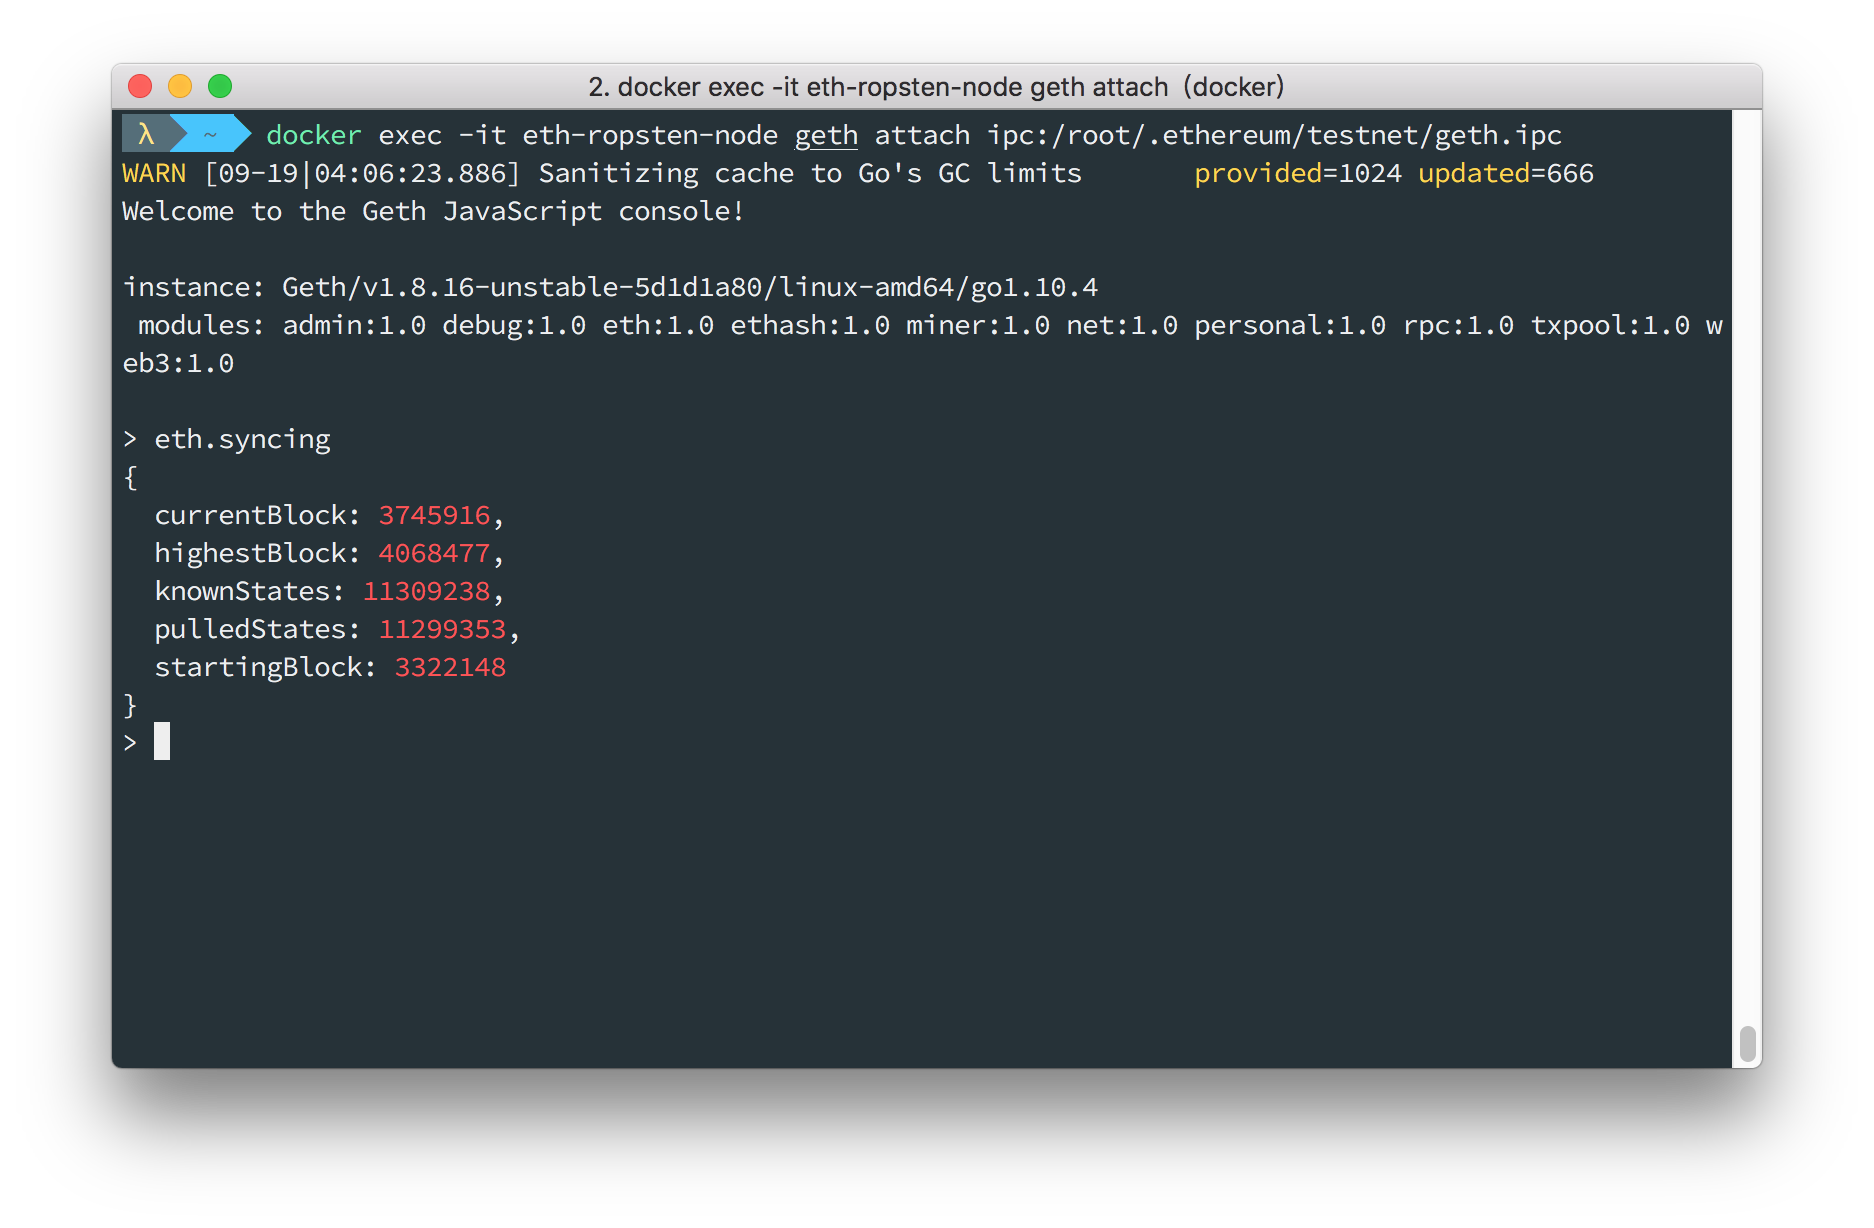
$ docker exec -it eth-ropsten-node geth attach ipc:/root/.ethereum/testnet/geth.ipc
一般來說,如果你是使用主鏈的話,可以直接使用
geth attach,因為上方設定為測試鏈,所以必須加上後面的路徑。
接著你可以看到以下畫面,輸入 eth.syncing 來查看區塊同步的情況:
你也可以直接輸入 eth,可以看到提供許多的函式,這些函式都可以和區塊鏈做互動:
> eth{accounts: [],blockNumber: 0,coinbase: undefined,compile: {lll: function(),serpent: function(),solidity: function()},defaultAccount: undefined,defaultBlock: "latest",gasPrice: 1000000000,hashrate: 0,mining: false,pendingTransactions: [],protocolVersion: "0x3f",syncing: {currentBlock: 3749807,highestBlock: 4069070,knownStates: 11312851,pulledStates: 11309555,startingBlock: 3322148},call: function(),contract: function(abi),estimateGas: function(),filter: function(options, callback, filterCreationErrorCallback),getAccounts: function(callback),getBalance: function(),getBlock: function(),getBlockNumber: function(callback),getBlockTransactionCount: function(),getBlockUncleCount: function(),getCode: function(),getCoinbase: function(callback),getCompilers: function(),getGasPrice: function(callback),getHashrate: function(callback),getMining: function(callback),getPendingTransactions: function(callback),getProtocolVersion: function(callback),getRawTransaction: function(),getRawTransactionFromBlock: function(),getStorageAt: function(),getSyncing: function(callback),getTransaction: function(),getTransactionCount: function(),getTransactionFromBlock: function(),getTransactionReceipt: function(),getUncle: function(),getWork: function(),iban: function(iban),icapNamereg: function(),isSyncing: function(callback),namereg: function(),resend: function(),sendIBANTransaction: function(),sendRawTransaction: function(),sendTransaction: function(),sign: function(),signTransaction: function(),submitTransaction: function(),submitWork: function()}
例如取得第 99 個區塊的資訊:
$ > eth.getBlock(99){difficulty: 827352,extraData: "0xd783010502846765746887676f312e362e33856c696e7578",gasLimit: 15232192,gasUsed: 0,hash: "0x3dd4dc843801af12c0a6dd687642467a3ce835dca09159734dec03109a1c1f1f",logsBloom: "0x00000000000000000000000000000000000000000000000000000000000000000000000000000000000000000000000000000000000000000000000000000000000000000000000000000000000000000000000000000000000000000000000000000000000000000000000000000000000000000000000000000000000000000000000000000000000000000000000000000000000000000000000000000000000000000000000000000000000000000000000000000000000000000000000000000000000000000000000000000000000000000000000000000000000000000000000000000000000000000000000000000000000000000000000000000000",miner: "0xc2fa6dcef5a1fbf70028c5636e7f64cd46e7cfd4",mixHash: "0x9ccbc308c21deece51af7ba19af8815d4ca9156bf39fcf88de0b4e0893df4ff8",nonce: "0x11b446b03241d3cd",number: 99,parentHash: "0xc2dcbcebd1c6bcd47323e98aa3255d158b35be85a76955bb11136454fe03a5f7",receiptsRoot: "0x56e81f171bcc55a6ff8345e692c0f86e5b48e01b996cadc001622fb5e363b421",sha3Uncles: "0x1dcc4de8dec75d7aab85b567b6ccd41ad312451b948a7413f0a142fd40d49347",size: 535,stateRoot: "0x485756cd70dd968b133f60b8dafa3ee8db3ce014af59ea5bcaaa2042ea552273",timestamp: 1479653843,totalDifficulty: 84969728,transactions: [],transactionsRoot: "0x56e81f171bcc55a6ff8345e692c0f86e5b48e01b996cadc001622fb5e363b421",uncles: []}
如何建立私鏈
#!/bin/shset -egeth --datadir /root/.ethereum/net42 init /root/genesis42.jsongeth --datadir /root/.ethereum/net42 --networkid 42
$ docker run -d --entrypoint "/root/run.sh" \--name private-chain-node \-v $HOME/private-chain-node:/root \-p 8541:8545 -p 30301:30303 \ethereum/client-go