在 GCP 上執行你第一個 Ansible Ad-Hoc Command


如果你是資訊相關科系,想必你大學都會經歷過要製作「專題」這件事情吧?你可以在專題上看到各式各樣同學所做的應用, 而我在大學時所做的專題是基於一個娛樂腳踏車所做的應用程式,那時候主要是負責後端的開發,由另外一位同學製作手機應用程式, 那時候為了要讓服務上線而開了一台便宜的 Amazon EC2,不過因為那時候沒有信用卡,還麻煩別人借用信用卡來辦帳號 😂。
想想自己對於雲端服務(操作)不熟悉,有很大部分原因是我是到工作之後才有辦信用卡,而基本上要使用這些雲端服務(Amazon、GCP)都需要綁定信用卡, 最近剛好有空窗期,可以來玩一下雲端的服務以及以前一些想試試看的東西。
Google Cloud Platform
Google Cloud Platform,又簡稱 GCP,有提供免費方案可以使用:
- 12 個月的免費試用期,提供 $300 美元抵免額,適用於任何 Google Cloud 服務。
- 「一律免費」計畫,讓使用者有限度地存取許多常用的 Google Cloud 資源,且不收取任何費用。
更詳細的說明可以參考這裡:https://cloud.google.com/free/docs/gcp-free-tier?hl=zh-tw
看準免費試用這一點,所以我就想先以 GCP 作為開始,基本上你有 Google 的帳號就可以開始使用 GCP 的服務了,如果想試用 GCP 可以透過上面的連結開始使用。
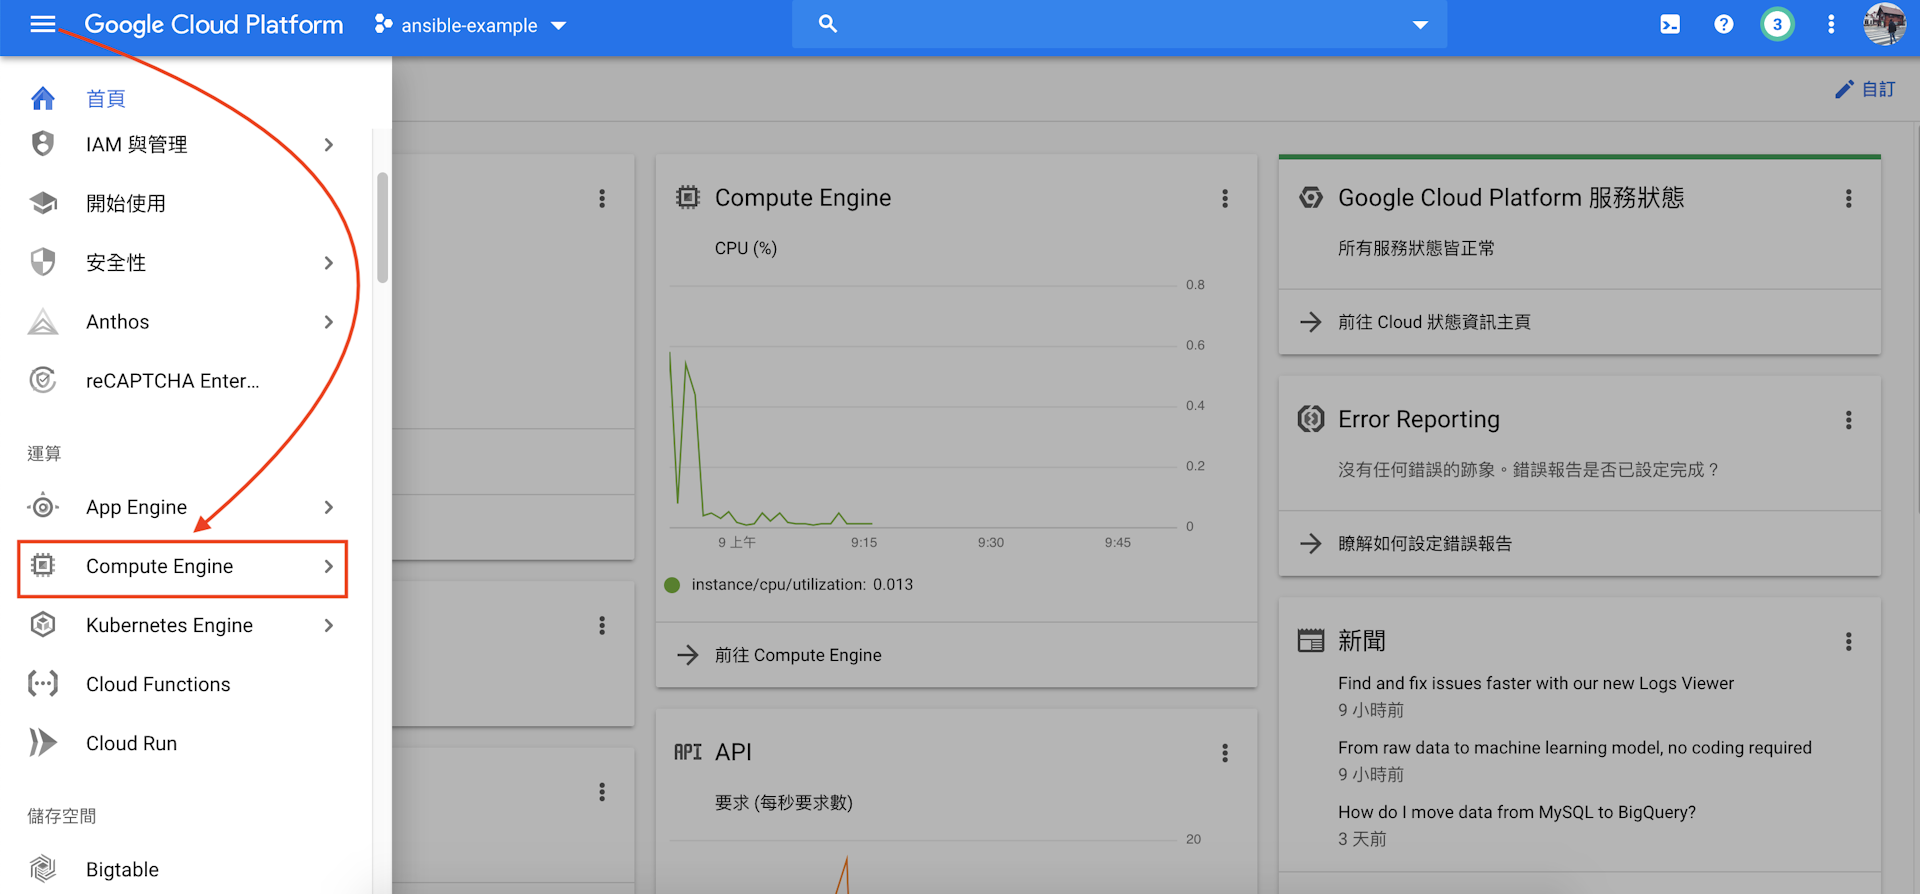
Create Your First Compute Engine
完成上述之後,你會進入到 GCP 的 web console 介面,接著建立 Compute Engine:

接著填寫你 compute engine 的資訊,區域的部分可以選擇台灣,連過去比較快:

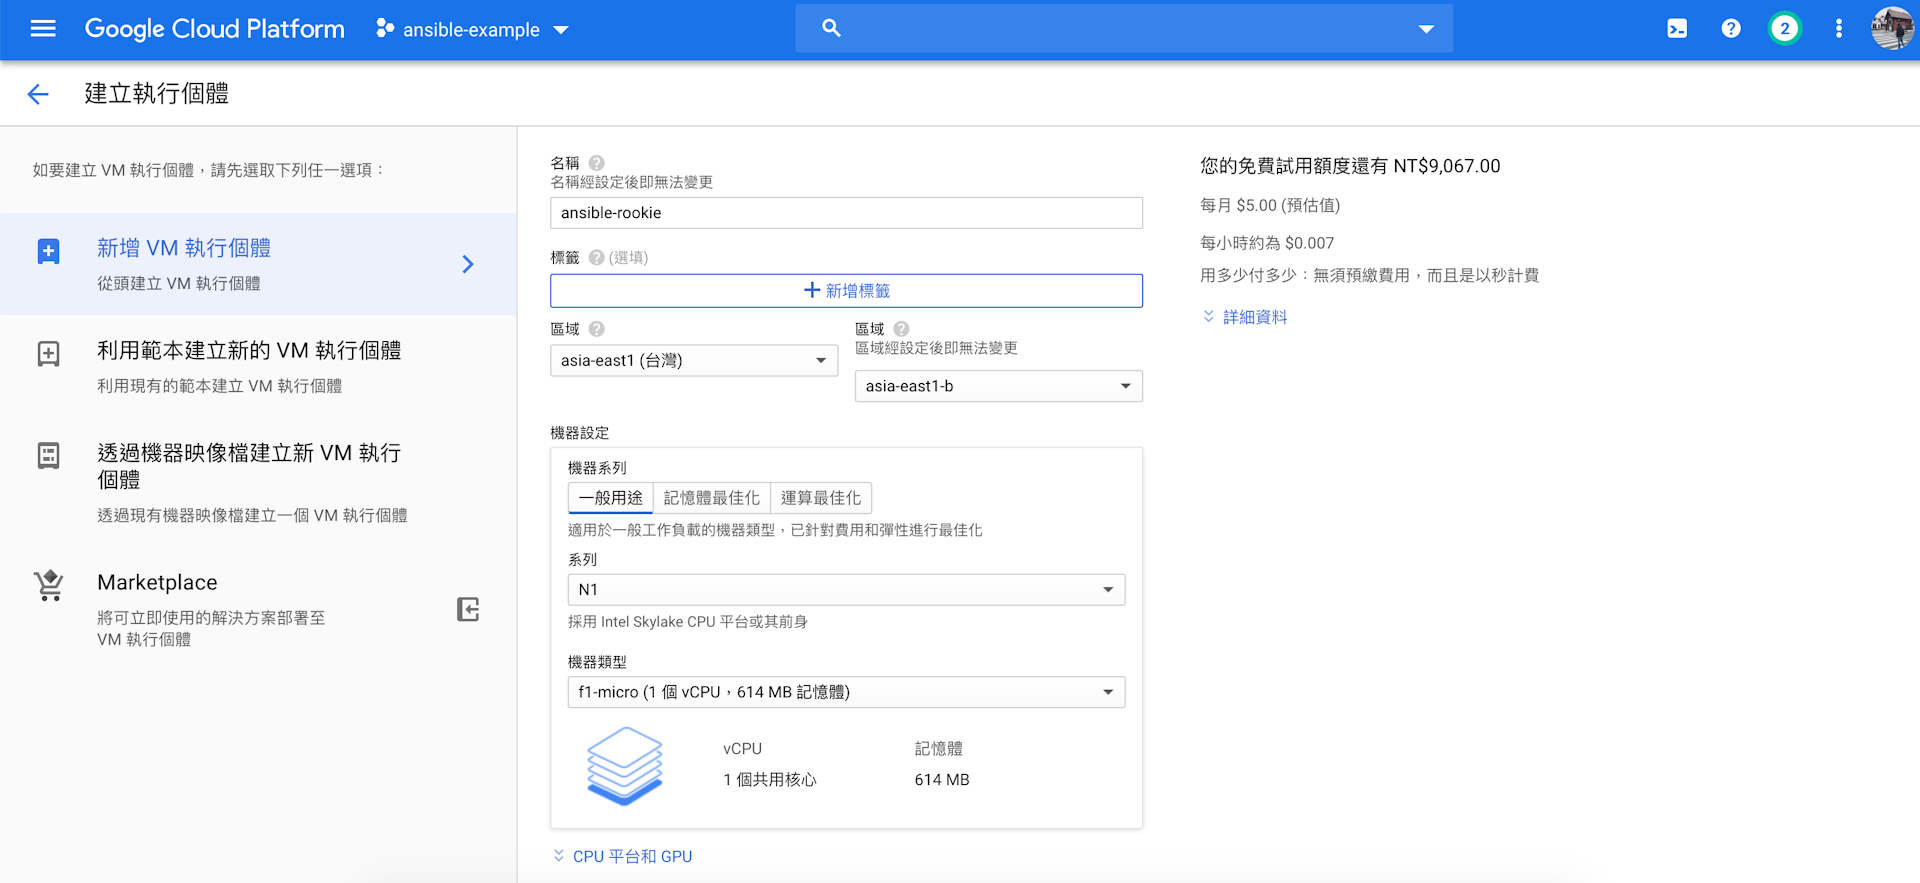
機器類型的部分可以根據你的選擇調整,這裡我選擇最低的 micro。

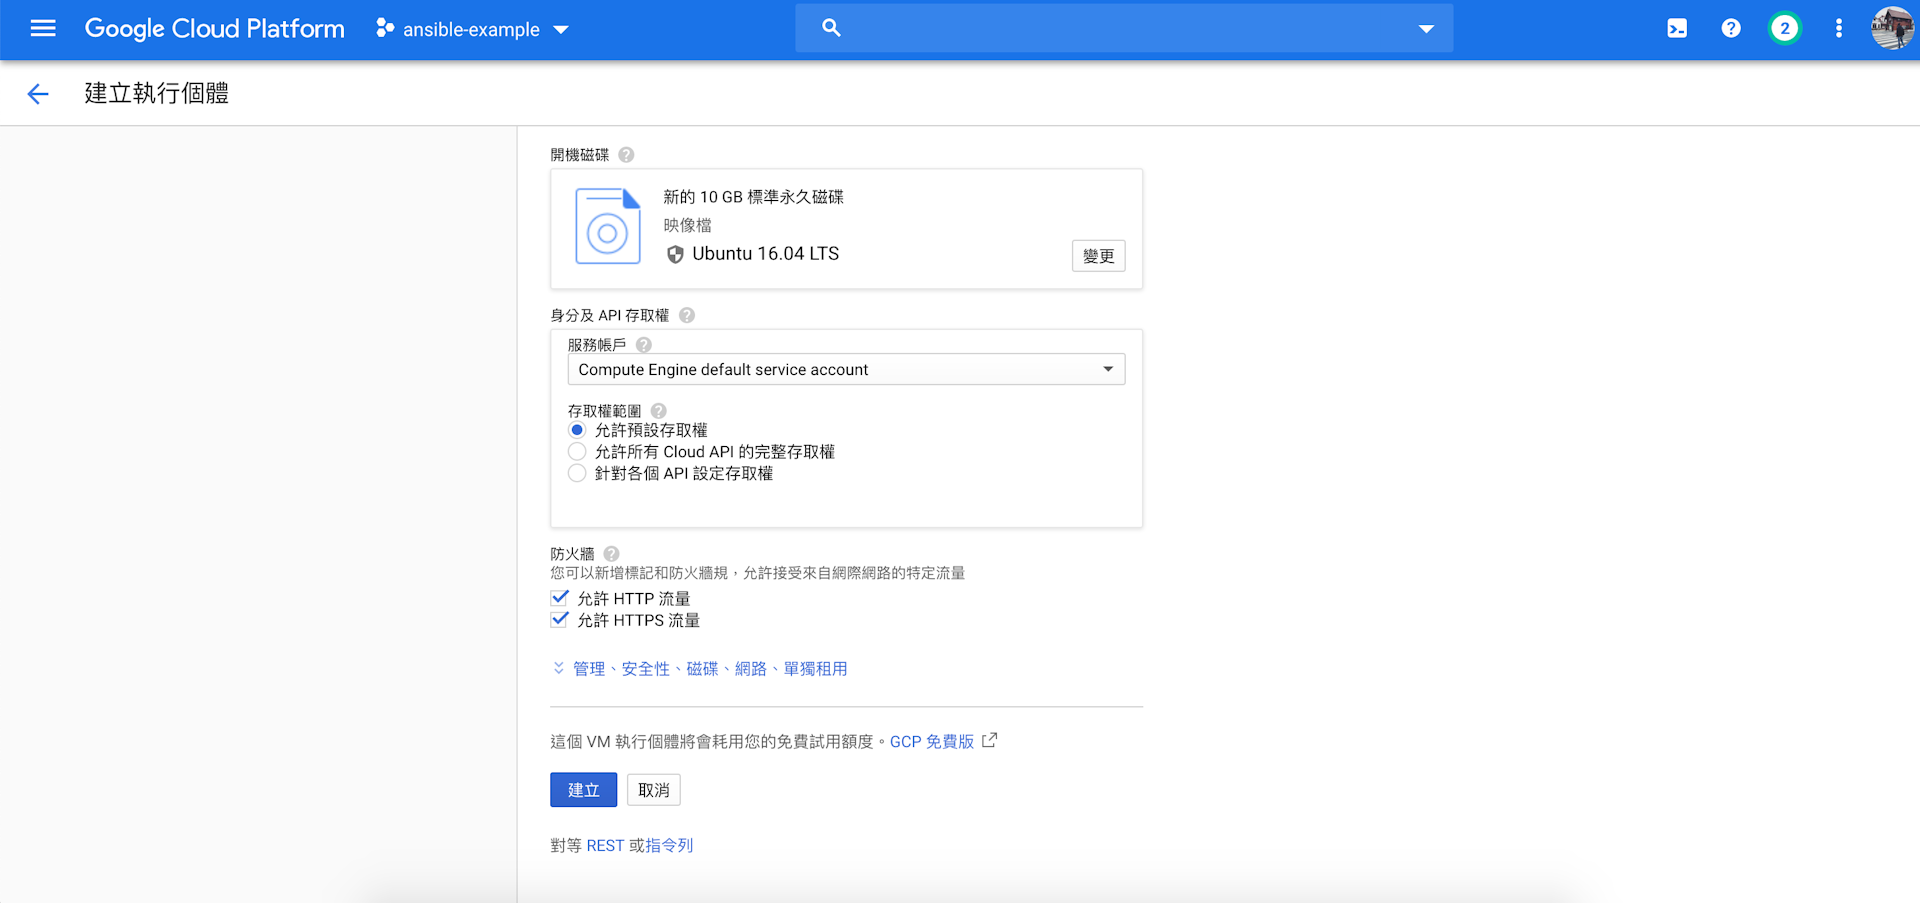
你也可已根據你的喜好設定開機磁碟,這裡我使用 Ubuntu,最後防火牆部分的因為之後會用 ssh 做登入,可以選擇勾選或不勾選。
Create SSH Key
為了方便等一下登入 GCE,請先建立好你的 SSH key,可以參考以下指令來建立:
$ ssh-keygen -t rsa -f ~/.ssh/[KEY_FILENAME] -C [USERNAME]$ chmod 400 ~/.ssh/[KEY_FILENAME]
可以到目錄 ~/.ssh 下查 ssh key,會有一個公鑰(public key)和私鑰(private key),檔案名稱分別是:
- 公鑰:
[KEY_FILENAME].pub - 私鑰:
[KEY_FILENAME]
Install Ansible
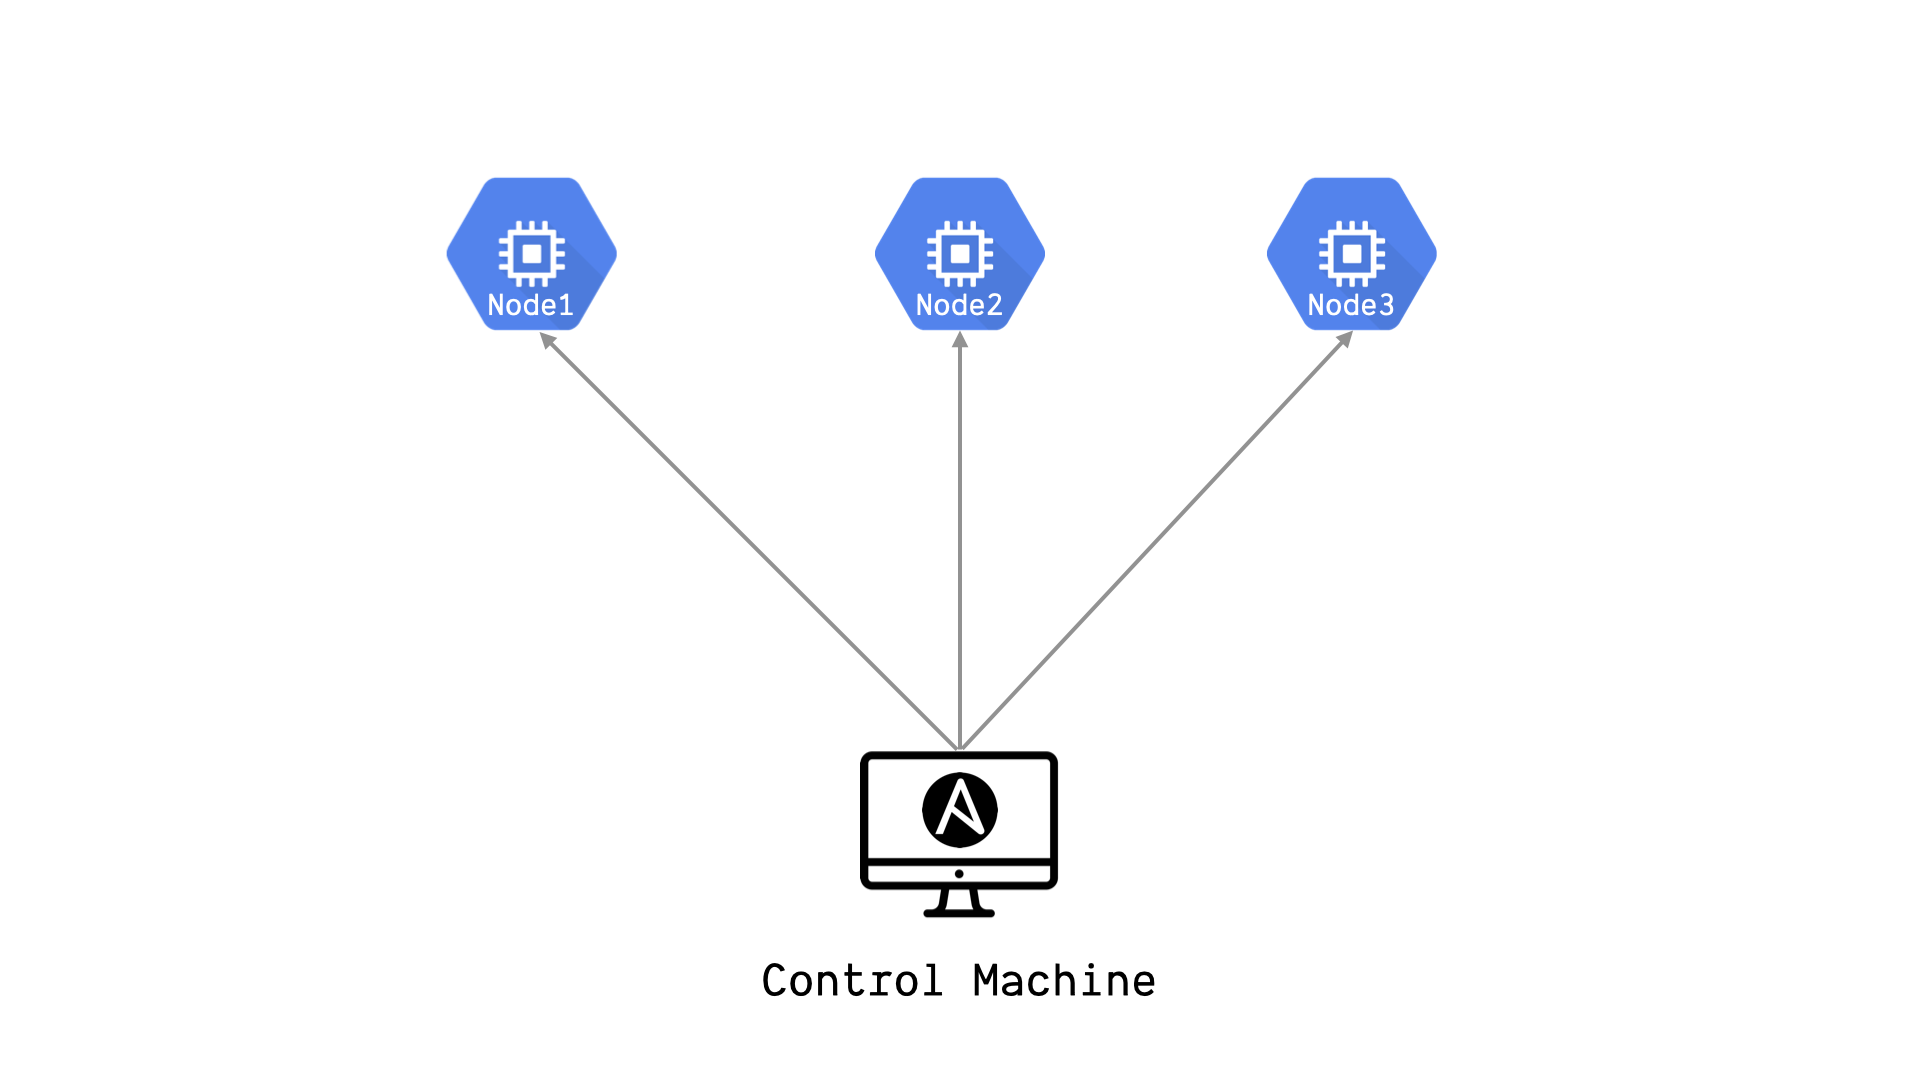
Anisble 是一個自動化的部署工具,使用方式也很簡單,只要控制端安裝好 ansible 後, 被控端的機器上只要具備 python 就可以對遠端機器進行操作了。
請根據你的作業系統安裝,這裡以 macOS 做為範例:
$ brew install ansible
安裝完 Ansible 後,預設 Ansible 會讀取 /etc/ansible 目錄底下的設定,通常會有 ansible.cfg 以及 hosts 這兩個檔案,如果沒有的話可以自己手動建立。
ansible.cfg是 ansible 的設定檔- 在 ansible 中 inventory 是一個很重要的概念,它是一份你的遠端伺服器的管理列表,包含主機的 IP 等其他資訊,
有時候也稱作 hostfile。而
hosts內容放的就是你遠端 server 的一系列資訊。
在工程上,會習慣將 ansible.cfg 以及 hosts 一起加入到版控當中,而原先在 /etc/ansible 目錄下的檔案該怎麼辦呢?
實際上 Ansible 支援多種來源的設定,預設會在 /etc/ansible 下,但我也可以在任一個資料夾下面建立 ansible.cfg 和 hosts 來進行操作,目錄的讀取順序如下:
ANSIBLE_CONFIG(環境變數)ansible.cfg(目前資料夾)~/.ansible.cfg(家目錄資料夾)/etc/ansible/ansible.cfg
如果找不到就會一直往下找,直到 /etc/ansible/ansible.cfg。
了解這個原理之後,請先建立一個範例資料夾叫做 ansible-rookie 以及 inventory,後面會用到:
$ mkdir ansible-rookie$ touch inventory
SSH Login To GCE
接著要透過 ssh 遠端登入到 GCE,在這之前有請你先建立了 ssh key,請到 ~/.ssh 目錄下找到你剛剛建立的 ssh key 並將 public key 的內容複製下來:
$ pbcopy < [KEY_FILENAME].pub
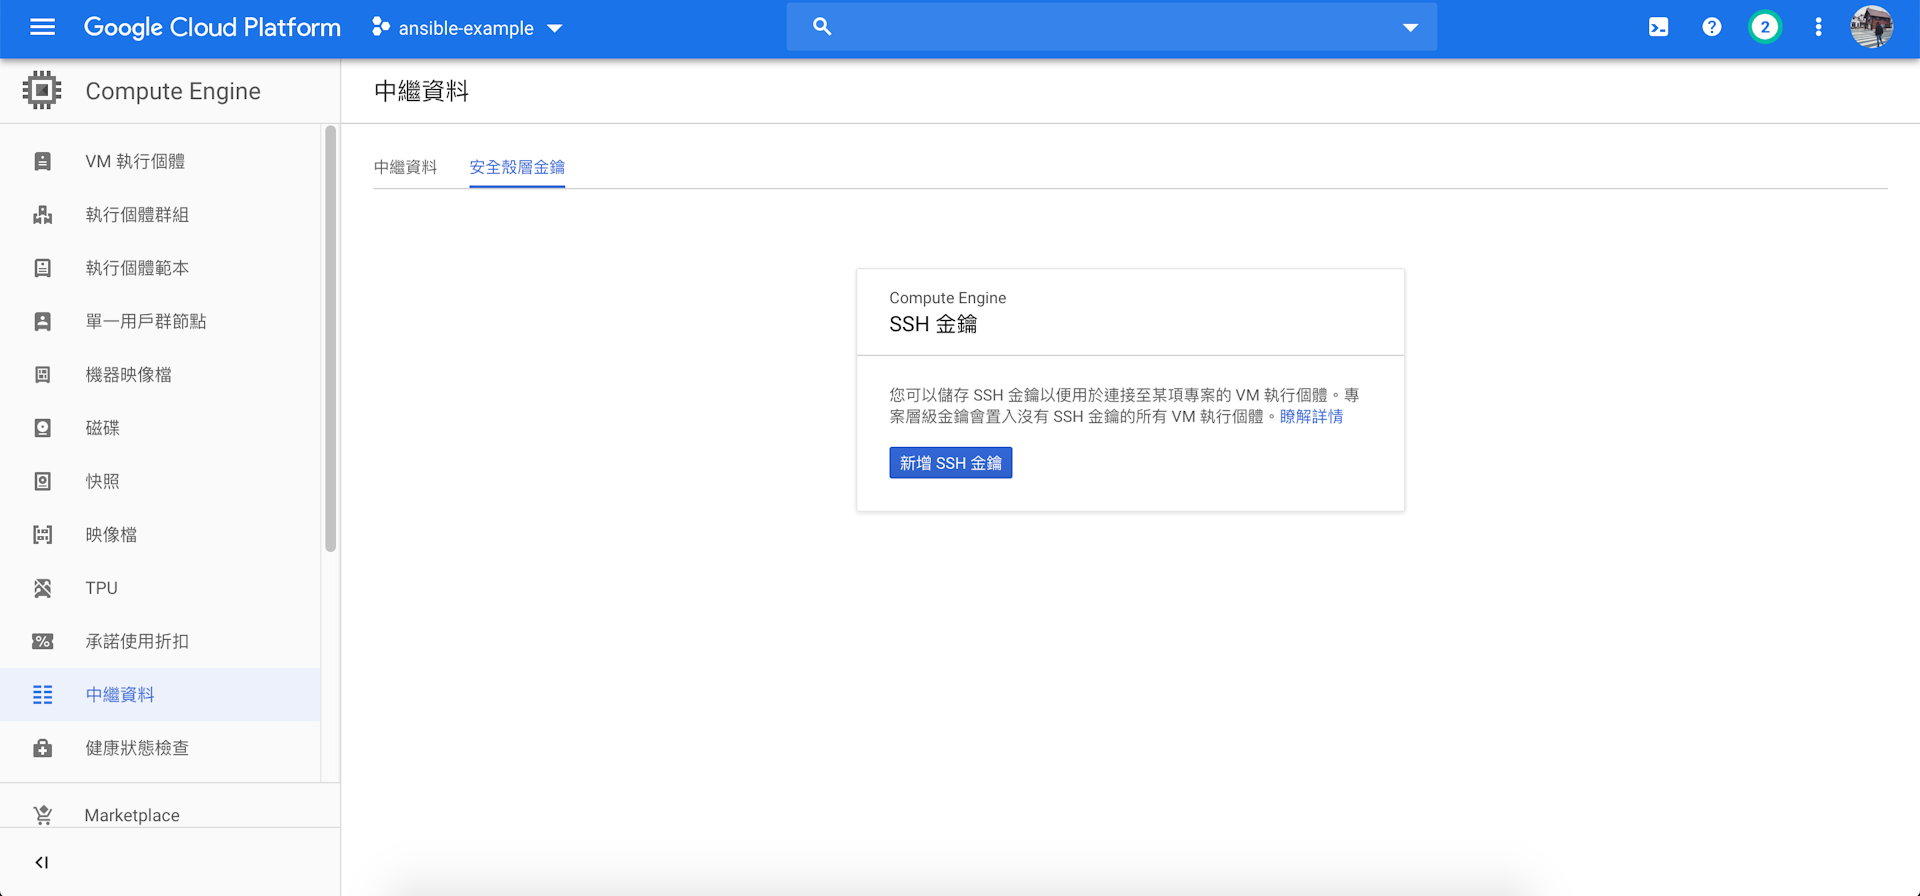
接著到 GCP 的 web console,並找到 Compute Engine 下的中繼資料,按下「新增 SSH 金鑰」:

將剛剛複製的 public key 貼上:


這樣就完成新增了,接下來透過 ssh 的方式來登入,KEY_FILENAME 就是你私鑰的名稱,username 則是使用者名稱,severIP 則是 GCE 公開的 IP:
$ ssh -i ~/.ssh/[KEY_FILENAME] [username]@[serverIP]
成功登入之後可以看到:
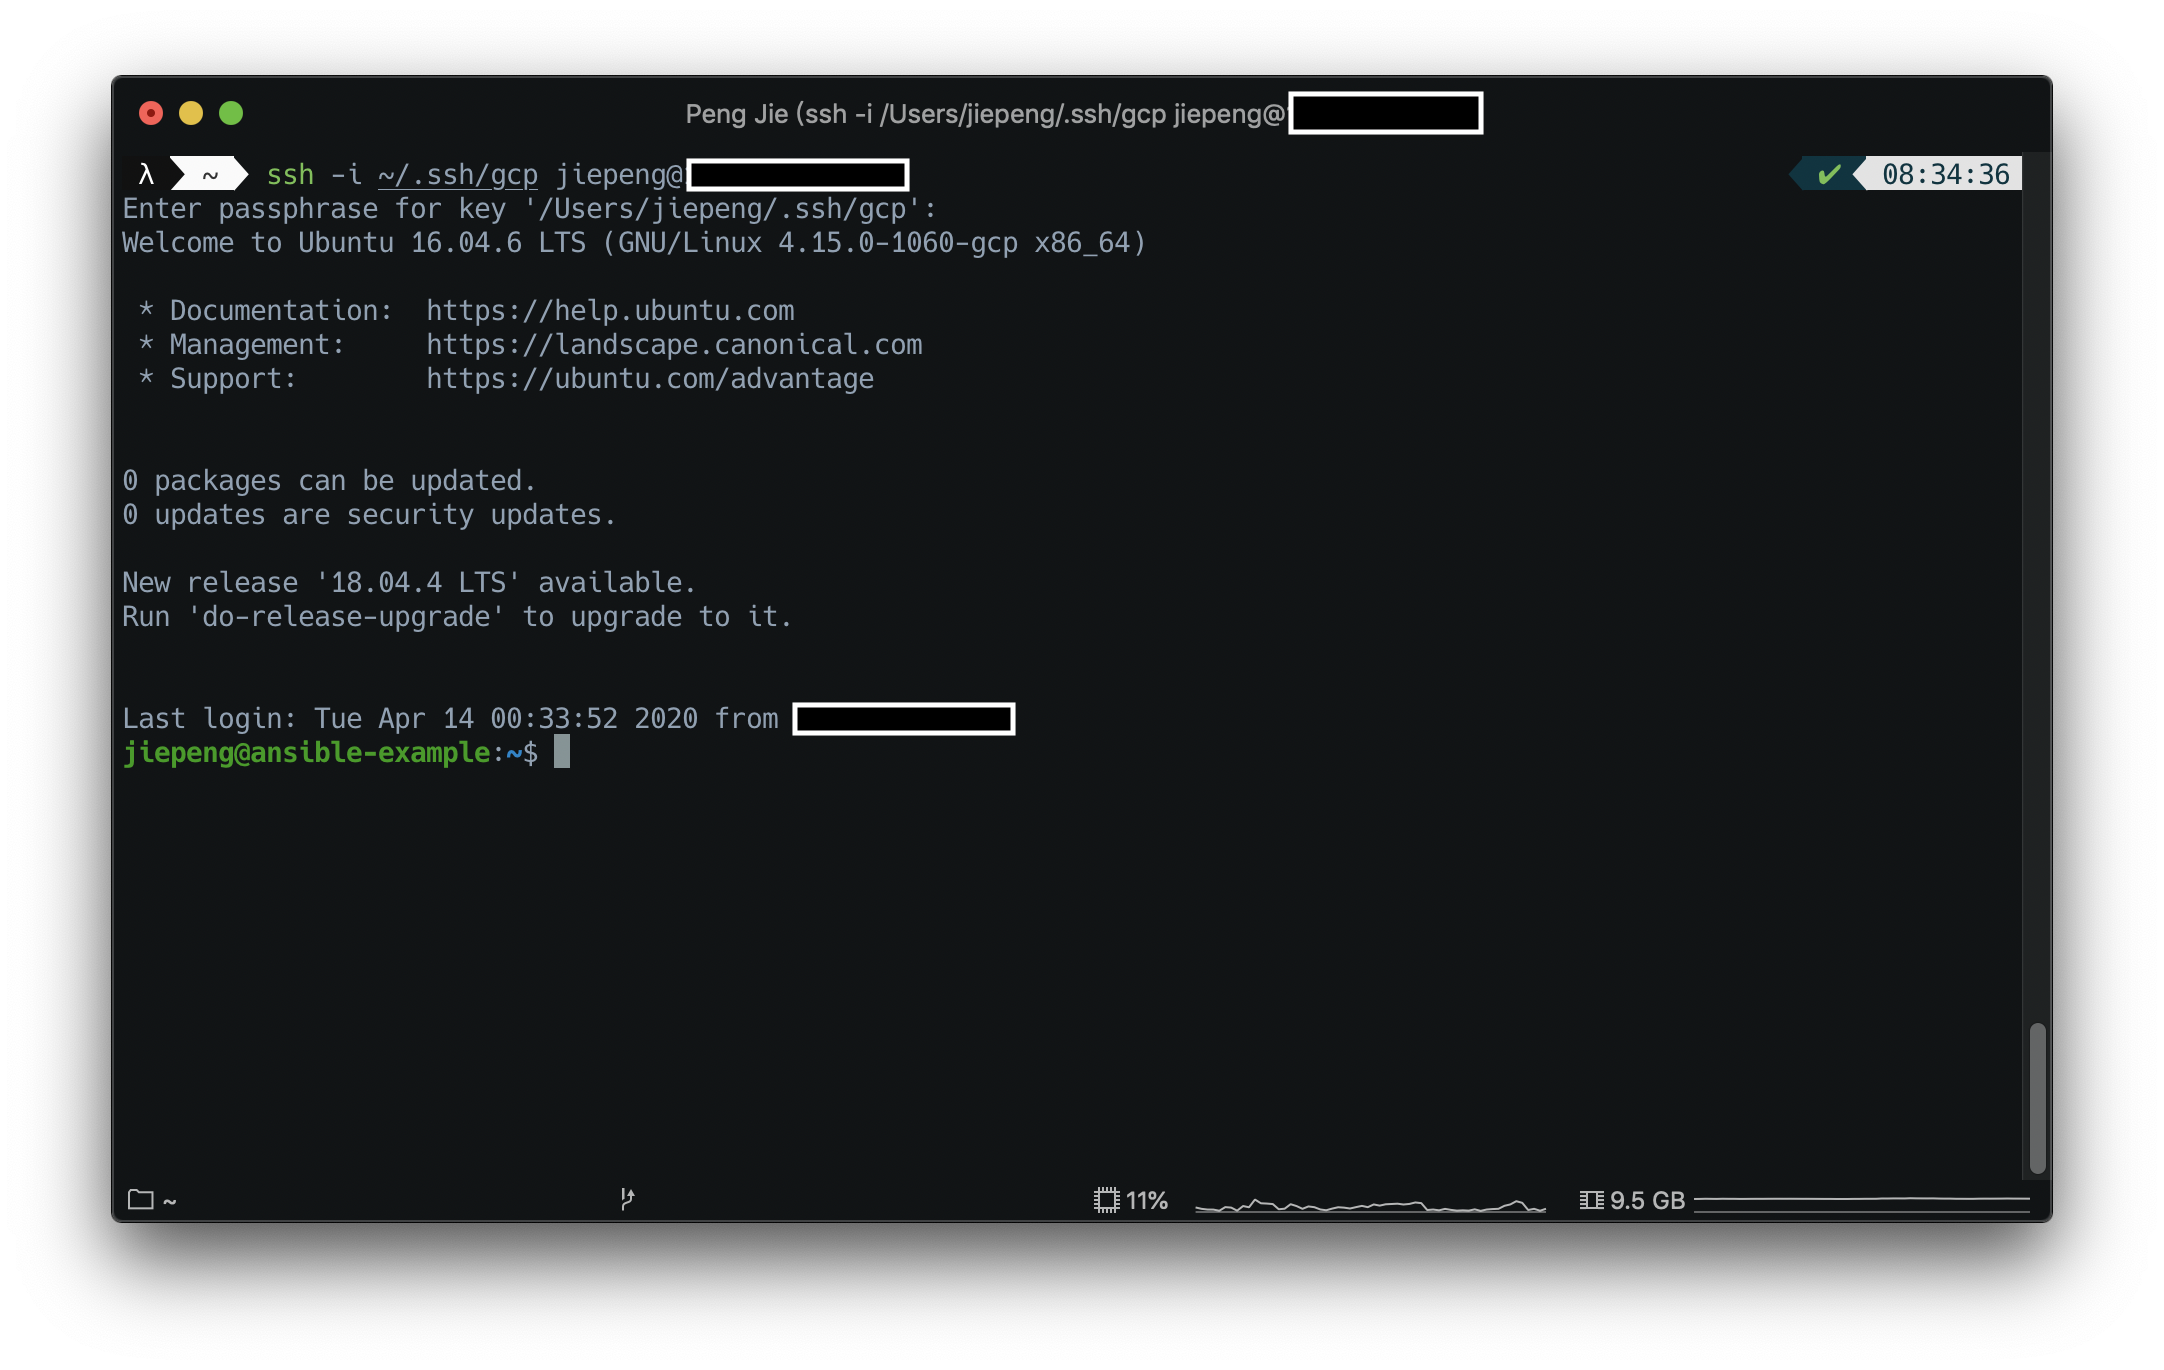
這樣代表你的 ssh 遠端登入沒有問題了,接下來讓我們回頭設定 Ansible。
Control Remote Machine By Ansible
在 ansible-rookie 目錄下的 inventory 檔案現在是空的,讓我們把 GCE 的資訊加入,這裡我開了兩台 GCE 作為範例:
[gcp]123.123.1.10 ansible_ssh_user=jiepeng ansible_ssh_private_key_file=~/.ssh/[KEY_FILENAME]123.123.1.11 ansible_ssh_user=jiepeng ansible_ssh_private_key_file=~/.ssh/[KEY_FILENAME]
可以看到要重複填入 ssh_user 還有 private_key_file 有點惱人,Ansible 提供了 Group Variables 的功能,
所以也可以考慮修改為:
[gcp]123.123.1.10123.123.1.11[gcp:vars]ansible_ssh_user=jiepengansible_ssh_private_key_file=~/.ssh/[KEY_FILENAME]
ansible_ssh_user 就是對應到我們 ssh 登入的 username,而 ansible_ssh_private_key_file 則是你的私鑰位置,
將這些資訊填入完畢之後,執行以下指令:
ansible -i inventory gcp -m ping
-i:參數是指定讀取目前我們目錄下的 inventory 檔案內的資料gcp:group 的名稱-m:使用 Ansible 的 ping module 去 ping 遠端的伺服器
成功的話你應該會得到類似如下的資訊:
$ ansible -i inventory gcp -m ping[DEPRECATION WARNING]: Distribution Ubuntu 16.04 on host 123.123.1.10 should use /usr/bin/python3, but is using/usr/bin/python for backward compatibility with prior Ansible releases. A future Ansible release will default tousing the discovered platform python for this host. Seehttps://docs.ansible.com/ansible/2.9/reference_appendices/interpreter_discovery.html for more information. Thisfeature will be removed in version 2.12. Deprecation warnings can be disabled by setting deprecation_warnings=Falsein ansible.cfg.123.123.1.10 | SUCCESS => {"ansible_facts": {"discovered_interpreter_python": "/usr/bin/python"},"changed": false,"ping": "pong"}123.123.1.11 | SUCCESS => {"ansible_facts": {"discovered_interpreter_python": "/usr/bin/python"},"changed": false,"ping": "pong"}
現在你已經成功了執行 Ansible 的 ad-hoc 的指令囉!
DEPRECATION WARNING 的錯誤基本上可以忽略,這主要問題是 python 版本的關係。 如果要解決的話可以在遠端 sever 安裝 python3,並且在你的 inventory 後面再加上
ansible_python_interpreter=auto, 詳細的資訊可以參考官方的文件說明。
[gcp]123.123.1.10 ansible_ssh_user=jiepeng ansible_ssh_private_key_file=~/.ssh/[KEY_FILENAME] ansible_python_interpreter=auto123.123.1.11 ansible_ssh_user=jiepeng ansible_ssh_private_key_file=~/.ssh/[KEY_FILENAME] ansible_python_interpreter=auto
為了消除這個警告,我在遠端伺服器上安裝 python3,再執行一次之後就警告不見了。
$ ansible -i inventory gcp -m ping123.123.1.10 | SUCCESS => {"ansible_facts": {"discovered_interpreter_python": "/usr/bin/python3"},"changed": false,"ping": "pong"}123.123.1.11 | SUCCESS => {"ansible_facts": {"discovered_interpreter_python": "/usr/bin/python3"},"changed": false,"ping": "pong"}
前面有提到 ansible.cfg,透過 ansible 設定檔的設定,在執行 ansible 的時候可以少輸入一些參數,
接下來請建立 ansible.cfg 檔案:
$ touch ansible.cfg
現在你的目錄下應該會有兩個檔案 ansible.cfg 以及 inventory:
$ lsansible.cfg inventory
接著編輯 ansible.cfg 的檔案內容:
[defaults]inventory = inventory
將建立的 inventory 的資訊填入到 inventory,執行指令測試看看:
$ ansible gcp -m ping123.123.1.10 | SUCCESS => {"ansible_facts": {"discovered_interpreter_python": "/usr/bin/python3"},"changed": false,"ping": "pong"}123.123.1.11 | SUCCESS => {"ansible_facts": {"discovered_interpreter_python": "/usr/bin/python3"},"changed": false,"ping": "pong"}
這次的指令少了 -i 指定 inventory 的部分,因為已經把這個資訊寫入 ansible.cfig 檔案內了,所以執行 ansible 指令時預設就會去讀取該檔案。
習慣上,會將 inventory 檔案命名成 hosts,看起來比較不會混淆,當然這看個人習慣,我把檔案名稱修改一下:
$ mv inventory hosts
修改 ansible.cfg:
[defaults]inventory = hosts
在 hosts 中,server ip 後加上了許多 ssh 相關的資訊,像是使用者名稱,這些其實可以搬到 ansible.cfg 內喔,讓我們來修改一下:
hosts 檔案修改後:
[gcp]123.123.1.10 ansible_python_interpreter=auto123.123.1.11 ansible_python_interpreter=auto
ansible.cfg 檔案修改後:
[defaults]inventory = hostsremote_user = jiepengprivate_key_file = ~/.ssh/[KEY_FILENAME]
重新執行指令測試結果:
$ ansible gcp -m ping123.123.1.10 | SUCCESS => {"ansible_facts": {"discovered_interpreter_python": "/usr/bin/python3"},"changed": false,"ping": "pong"}123.123.1.11 | SUCCESS => {"ansible_facts": {"discovered_interpreter_python": "/usr/bin/python3"},"changed": false,"ping": "pong"}
可以看到設定上非常彈性,你可以根據你的需求來做設定,而如果不知道 ansible.cfg 有哪些參數可以設定的話,
請參考 Ansible Configuration Settings,下方有各式各樣的參數說明,
不過我覺得閱讀起來真的有點痛苦 😂,如果要方便快速的話可以參考 ansible 在 GitHub 的範例,下方有各式各樣的參數說明,
每個參數都有描述可以參考。
提醒
使用完 GCE 之後,若沒有要繼續使用的話,請記得回到 GCP 上將機器關掉,雖然有免費額度的使用,但避免萬一還是習慣把機器關掉比較保險呦。